Xlib 03: Opengl fixed function from scratch window in Xlib
Introduction
We will continue exploring creating windows from scratch in linux using Xlib. Here we will look into opening basic window and draw onto it using opengl using fixed function pipeline. You can look into previous post if you want to compare this approach with software rendering.
I wanted to start with fixed-function because it is a lot easier and can help understand basics of opengl setup. Once you know how to start with basic opengl then moving to shaders will be a bit easier than trying to grasp all at the same time.
Here is the final code 06_window_opengl_direct.c:
#include <stdio.h>
#include <X11/Xlib.h>
#include <stdlib.h>
#include <GL/glx.h>
static int DoubleBufferAttributes[] = {
GLX_RGBA,
GLX_RED_SIZE, 1,
GLX_GREEN_SIZE, 1,
GLX_BLUE_SIZE, 1,
GLX_DEPTH_SIZE, 12,
GLX_DOUBLEBUFFER,
None,
};
void VerifyOrDie(int ResultStatus, const char *Message) {
if(ResultStatus == 0) {
fprintf(stderr, "%s", Message);
exit(2);
}
}
int main()
{
Display* MainDisplay = XOpenDisplay(0);
int MainScreen = XDefaultScreen(MainDisplay);
Window RootWindow = XDefaultRootWindow(MainDisplay);
int Dummy;
int ResultStatus = glXQueryExtension(MainDisplay, &Dummy, &Dummy);
VerifyOrDie(ResultStatus != 0, "Error: X Server has not GLX extension\n");
XVisualInfo* VisualInfo = glXChooseVisual(MainDisplay, MainScreen, DoubleBufferAttributes);
VerifyOrDie(VisualInfo != 0, "glXChooseVisual returned 0");
VerifyOrDie(VisualInfo->class == TrueColor, "No True COlor support. Cannot run program without it");
GLXContext ShareList = None;
int IsDirectRendering = True;
GLXContext OpenGLContext = glXCreateContext(MainDisplay, VisualInfo, ShareList, IsDirectRendering);
VerifyOrDie(OpenGLContext != 0, "ERROR: Couldn't create rendering context\n");
int WindowX = 0;
int WindowY = 0;
int WindowWidth = 800;
int WindowHeight = 600;
int BorderWidth = 0;
int WindowClass = InputOutput;
int WindowDepth = VisualInfo->depth;
Visual* WindowVisual = VisualInfo->visual;
int AttributeValueMask = CWBackPixel | CWEventMask | CWColormap;
XSetWindowAttributes WindowAttributes = {};
WindowAttributes.colormap = XCreateColormap(MainDisplay, RootWindow, VisualInfo->visual, AllocNone);
WindowAttributes.background_pixel = 0xffafe9af;
WindowAttributes.event_mask = StructureNotifyMask | KeyPressMask | KeyReleaseMask | PointerMotionMask;
Window MainWindow = XCreateWindow(MainDisplay, RootWindow,
WindowX, WindowY, WindowWidth, WindowHeight,
BorderWidth, WindowDepth, WindowClass, WindowVisual,
AttributeValueMask, &WindowAttributes);
XStoreName(MainDisplay, MainWindow, "Opengl: Fixed function pipeline");
glXMakeCurrent(MainDisplay, MainWindow, OpenGLContext);
XMapWindow(MainDisplay, MainWindow);
Atom WM_DELETE_WINDOW = XInternAtom(MainDisplay, "WM_DELETE_WINDOW", False);
if(!XSetWMProtocols(MainDisplay, MainWindow, &WM_DELETE_WINDOW, 1)) {
printf("Couldn't register WM_DELETE_WINDOW\n");
}
int IsProgramRunning = 1;
while(IsProgramRunning) {
while(XPending(MainDisplay)) {
XEvent GeneralEvent = {};
XNextEvent(MainDisplay, &GeneralEvent);
switch(GeneralEvent.type) {
case ClientMessage:
{
IsProgramRunning = 0;
} break;
}
}
{
glClearColor(0.0, 0.0, 0.2, 1.0);
glClear( GL_COLOR_BUFFER_BIT | GL_DEPTH_BUFFER_BIT );
float Offset = 0.9;
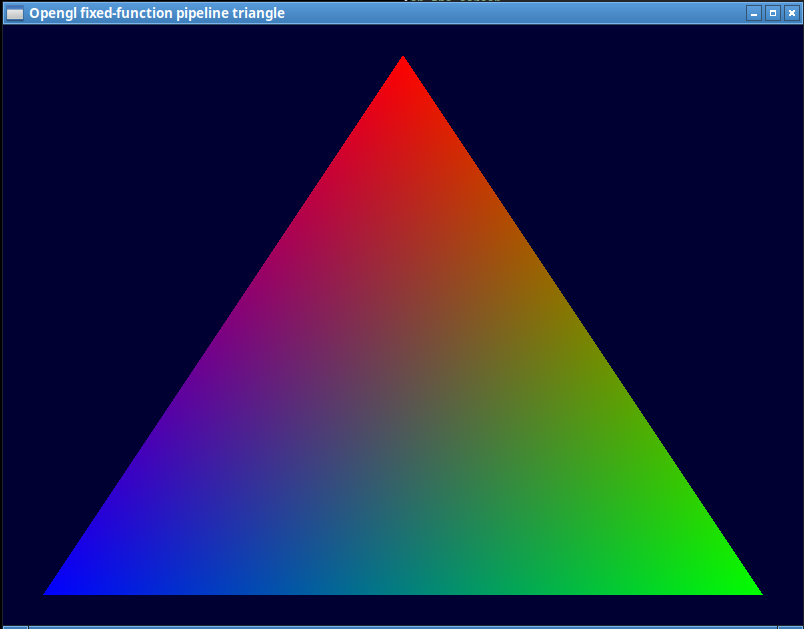
glBegin(GL_TRIANGLES);
glColor3f(1.0, 0.0, 0.0);
glVertex2f(0, Offset);
glColor3f(0.0, 1.0, 0.0);
glVertex2f(Offset, -Offset);
glColor3f(0.0, 0.0, 1.0);
glVertex2f(-Offset, -Offset);
glEnd();
/* glFlush(); */
glXSwapBuffers(MainDisplay, MainWindow);
}
}
}
Compile it with: gcc 06_window_opengl_fixed_function.c -o 06_window_opengl_fixed_function -lX11 -lGL
Explanation
First of all we need to include <GL/glx.h> into source code and add -lGL linker flag to link with opengl. GLX is an OpenGL X Window system extension. It add some function that start with glX prefix and all this functions are needed to ask X Server to do some opengl magic behind the scenes (not always but enough for this beginning).
We get regular stuff that we had to get in previous version: a display, a screen and root window. After that we use glXQueryExtension(…) to check if opengl is available. Here depending on our approach to handling this we could fall back to software rendering, rendering on X Server side or just plain stop the application like we did in this example. If this function return anything but 0 then there is some issue and we cannot continue.
Then we get a Visual which is compatible with our requirements. In this case we want a visual that supports regular RGBA and we want it to be double buffered. If for some reason you want to try without double buffering you could comment out GLX_DOUBLEBUFFER but you would have to call glFlush() instead of glXSwapBuffers(MainDisplay, MainWindow). Otherwise it will not render anything on the screen.
One more thing we need is regular opengl context that is used by opengl to store different “drawing settings”. We get it with glXCreateContext(…). In this example we will not be needing it for anything but initialization but if you want play around with different drawing modes then you can try it yourself.
Now we can actually create a regular X window like we did before. The only difference is that we need to provide a visual compatible with opengl settings that we specified. In previous examples we just compied visual from our parent root window and that was enough. In this case it had to be selected specifically to be compatible with opengl.
And now after all that we can just enable the opengl context with glXMakeCurrent() and after showing the window we can start regular drawing that we used before but now instead of software rendering we will use opengl. So after we processed all events we clear the screen with glClear() and do old fixed function pipleine actions to draw onto the window. We begin drawing with glBegin(…) and create 3 vertices with glVertex2f(…). Each vertext will get it’s own color with the help of glColor3f(…). Once we done describing our scene we just finish drawing with glEnd(). After all this we need to tell opengl to swap buffers with glXSwapBuffers(…). If you used single buffer rendering you would have to call glFlush() here.
This is that simple. Just process the events and send rendering commands to opengl. If I were plannig to do more complex rendering then a better approach would be to move this out into a separate function but for this demo I wanted to simplify everything and make things as straighforward as possible.
Here is what you should get:
Conclusion
Code in this example is even smaller that the previous one. I reduced functionality specifically to focus on general opengl initialization and setup so that you will get a better understanding of how the parts are tied together and the fewer parts we have the easier it to understand.
If I were you I would have tried to replicate previous example with this opengl approch. So create a rectagnle that is moving on the screen.
But don’t forget that this approach is not how modern opengl code is used and don’t use it for real projects. It is good to understand the concepts and to play around with basic ideas. In the next post I will show how to do the same thing but with shaders.