Xlib 01: Creating windows from scratch with Xlib on Linux
Introduction
In this post I wanted to go over creating windows using raw Xlib (X11) and show how to approach the task if you want to do it from scratch. Current trend is to use Wayland and a lot of distros already switched to using it but still there are a very large portion of computers that are using X11.
When I first was learning how to open working with X11 it was very problematic to find any tutorial that clearly showed basics and allowed me to start playing around quickly. Reading documentation is possible but takes a lot of time and effort. Other tutorials looked like introduced too much moving parts and was a bit complex for fresh and uninformed mind.
Here I will try to show how to create windows peace by peace with slowly increasing complexity. But each peace should be self sustained and you can choose which ever suits your needs.
Disclaimer:This is is not a tutorial how to create create GUI apps for linux and if you are not sure what to use then this post is definetely not for you. Go look for Qt or something similar.
01. Opening simple window
Here is the simplest way to open a window 01_simple_window.c.
#include <X11/Xlib.h>
#include <unistd.h>

int main()
{
    Display* MainDisplay = XOpenDisplay(0);
    Window RootWindow = XDefaultRootWindow(MainDisplay);

    Window MainWindow = XCreateSimpleWindow(MainDisplay, RootWindow, 0, 0, 800, 600, 0, 0, 0x00aade87);
    XMapWindow(MainDisplay, MainWindow);
    XFlush(MainDisplay);

    for(;;) { sleep(1); }
}
We can compile this code with: gcc 01_simple_window.c -o 01_simple_window -lX11
The only thing that we need is to link with X11 using -lX11 flag during compilation and need to include <X11/Xlib.h> in order to give our program access to Xlib function definitions.
In order to open our simple window we need just five function from Xlib.
- XOpenDisplay
- XDefaultRootWindow
- XCreateSimpleWindow
- XMapWindow
- XFlush
First of all with XOpenDisplay we get a value for current Display. If we had multiple displays we could have provided display name as a (char*) argument to the function. But since we are using a default one we can just pass 0 (a.k.a NULL) and Xorg will get default display name from $DISPLAY environent variable.
After that we get a root window. We need it to because window (except root window) must have a parent. So we get a main window to parent our window under it.
For this example we user XCreateSimpleWindow(…) to create our window. For parameters it takes display, parent, x, y, width, height, border_width, border and background. X and Y are offset in the screen that we want to show our window. Width and Height are dimensions for the window. Border andd Background are int’s that describe colors. Window manager could ignore X, Y, Width, Height and Border values and use whatever values it wants. My window manager (openbox) opens window with correct width and height but ignores the rest. The pixel color value is a 4 byte integer value with first byte being not important and the rest are red, green and blue values of the colors.
Next we need to “map” our window with XMapWindow(…). Map is weird name for a function that just shows a window. So basically this could have been named XShowWindow but it is what it is. After we call it it should opened window.
One last thing that we have to do in this example is to flush xlib commands. Xlib is bufferent commands that we issue. Usually we don’t need to call XFlush because we have a normal event loop but in this simple example we use endless loop. We need it to run endless so that it won’t stop right away.
You can play with window. Change its size, move it around and even close it. But after you close the window you will have to terminal the program due to our approach to using endless for loop to keep it open. So just move back to terminal and press Ctrl-C and terminate that process.
02. Create window
So let’s try to create the same window with regular XCreateWindow. It is a bit more involved but not too much. Here is 02_create_window.c.
#include <X11/Xlib.h>

int main()
{
    Display* MainDisplay = XOpenDisplay(0);
    Window RootWindow = XDefaultRootWindow(MainDisplay);

    int WindowX = 0;
    int WindowY = 0;
    int WindowWidth = 800;
    int WindowHeight = 600;
    int BorderWidth = 0;
    int WindowDepth = CopyFromParent;
    int WindowClass = CopyFromParent;
    Visual* WindowVisual = CopyFromParent;

    int AttributeValueMask = CWBackPixel;
    XSetWindowAttributes WindowAttributes = {};
    WindowAttributes.background_pixel = 0xffafe9af;

    Window MainWindow = XCreateWindow(MainDisplay, RootWindow,
            WindowX, WindowY, WindowWidth, WindowHeight,
            BorderWidth, WindowDepth, WindowClass, WindowVisual,
            AttributeValueMask, &WindowAttributes);

    XMapWindow(MainDisplay, MainWindow);

    for(;;) {
        XEvent GeneralEvent = {};
        XNextEvent(MainDisplay, &GeneralEvent);
    }
}
Compile this code with: gcc 02_create_window.c -o 02_create_window -lX11
It looks the same as the previous window but works slightly different. We still use endless for loop but instead of sleeping we use XNextEvent(…) to wait for an event instead of using XFlush(…). XNextEvent will flush everything so that we don’t have to do it manually.
We use XCreateWindow(…) instead of XCreateSimpleWindow(…). This function requires a bit more parameters and a bit more setup. First of all values are put into a variables with names for easier readability. It is not required but just makes code easier to understand.
Comprared to simple version border color and background color are not passed as parameters. New parameters ‘border width’, ‘window depth’, ‘window class’, ‘window visual’, ‘attributes values mask’, ‘window attributes’ are added.
Border width is not important. Window depth is a “depth” of monitor or how many bits of information is used for color. We could set it to 24 or just use CopyFromParent and it will just work. Dont’ worry about it as it is also not an important parameter and you can just use defaults.
Window class can either be InputOutput or InputOnly. First one is for when you want to have a visible window (pretty much every time) and second is for windows which will never draw. Basically we need only InputOuput or you can just CopyFromParent which in our case copy from root window.
Then there is Visual that is used for the window. It is opaque data structure which contains some information about colors and we can juse use CopyFromParent and safely ignore it (for this case).
The most important part is ‘window attributes’ and a related ‘attibute mask’. In the struct of type XSetWindowAttributes we can set different options related to the window. For example to set window background we passed it as a separate parater to function. Here we set it in the struct and pass the whole struct. For optimization purposes X11 uses ‘value mask’ to know what was passed in the struct set exactly that. So if you set background color in the struct and forget to set CWBackPixel bit then it won’t work.
Here is the list of attributes that could be set in XSetWindowAttributes struct:
- Pixmap background_pixmap;
- unsigned long background_pixel;
- Pixmap border_pixmap;
- unsigned long border_pixel;
- int bit_gravity;
- int win_gravity;
- int backing_store;
- unsigned long backing_planes;
- unsigned long backing_pixel;
- Bool save_under;
- long event_mask;
- long do_not_propagate_mask;
- Bool override_redirect;
- Colormap colormap;
- Cursor cursor;
and don’t forget to set the correspondig bit in the value mask. You can just or the values together like this: int AttributeValueMask = CWBackPixel | CWEventMask;
Here is the list of bits values that can be used in the mask: CWBackPixmap, CWBackPixel, CWBorderPixmap, CWBorderPixel, CWBitGravity, CWWinGravity, CWBackingStore, CWBackingPlanes, CWBackingPixel, CWOverrideRedirect, CWSaveUnder, CWEventMask, CWDontPropagate, CWColormap, CWCursor.
As you can see we don’t need to set all the fields. Just the one that are important for our usecase. One of the most important ones is event_mask field. This will be used to filter which events we want to recieve. Currently we set it up so that none of the events will be available to us. So the very last of the file where we use XNextEvent(…) will just get stuck waiting for new event and will not get any. The good news is that we used XNextEvent(…) we don’t need to go back to terminal and use Ctrl-C to terminal program as it will stop working as soon as window manager closes our window.
03. Create windows with events
Here is is 03_create_window_with_events.c
#include <X11/Xlib.h>
#include <X11/Xutil.h>

int main()
{
    Display* MainDisplay = XOpenDisplay(0);
    Window RootWindow = XDefaultRootWindow(MainDisplay);

    int WindowX = 0;
    int WindowY = 0;
    int WindowWidth = 800;
    int WindowHeight = 600;
    int BorderWidth = 0;
    int WindowDepth = CopyFromParent;
    int WindowClass = CopyFromParent;
    Visual* WindowVisual = CopyFromParent;

    int AttributeValueMask = CWBackPixel | CWEventMask;
    XSetWindowAttributes WindowAttributes = {};
    WindowAttributes.background_pixel = 0xffffccaa;
    WindowAttributes.event_mask = StructureNotifyMask | KeyPressMask | KeyReleaseMask | ExposureMask;

    Window MainWindow = XCreateWindow(MainDisplay, RootWindow,
            WindowX, WindowY, WindowWidth, WindowHeight,
            BorderWidth, WindowDepth, WindowClass, WindowVisual,
            AttributeValueMask, &WindowAttributes);

    XMapWindow(MainDisplay, MainWindow);

    int IsWindowOpen = 1;
    while(IsWindowOpen) {
        XEvent GeneralEvent = {};
        XNextEvent(MainDisplay, &GeneralEvent);

        switch(GeneralEvent.type) {
            case KeyPress:
            case KeyRelease:
            {
                XKeyPressedEvent *Event = (XKeyPressedEvent *)&GeneralEvent;
                if(Event->keycode == XKeysymToKeycode(MainDisplay, XK_Escape))
                {
                    IsWindowOpen = 0;
                }
            } break;
        }
    }
}
Compile it with: gcc 03_create_window_with_events.c -o 03_create_window_with_events -lX11
Here we add one more header file <X11/Xutil> in order to have access to key definitions.
The main that needs to be done first is to add to event_mask a list of events that we want to receive from the server: StructureNotifyMask, KeyPressMask, KeyReleaseMask, ExposureMask. KeyRelease and KeyPress are self explanatory. StructureNotifyMask will deliver events related to changes in size and ExporeMask will deliver events related to window needing to be redrawn. For example when window is first shawn or when part of window was first hidden by some other window and then shown again. At the same time don’t forget to add CWEventMask so that Xorg will know to look into the event_mask attribute;
Now we change our infinite for loop into infinite while loop with condition IsWindowOpen so it will loop until this condition is set to true (or 1 in our case).
When XNextEvent(…) recieves event it puts it into variable with type XEvent which is a general type for all events. Then we can switch over is .type field and know what type of event came to us. In our example we look into KeyPress and KeyRelease events and when they come we cast it to XKeyPressedEvent which could be used to extract infromation about which keys have been pressed/released. Here with the help of XKeysymToKeycode(…) we convert XK_Escape value to a keycode and compare it with the data that came from server. If they match it means that escape key was pressed and we just close the window by setting IsWindowOpen to false (0) and thus terminating the endless loop.
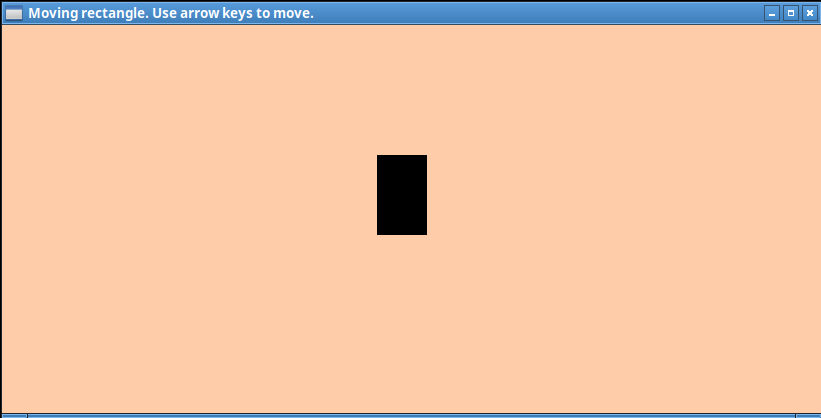
04. Final: Create window to move stuff around
Here is 04_rectangles_and_action.c
#include <X11/Xlib.h>
#include <X11/Xutil.h>
#include <stdio.h>

typedef struct {
    int X;
    int Y;
    int Width;
    int Height;
} entity;

int main()
{
    Display* MainDisplay = XOpenDisplay(0);
    Window RootWindow = XDefaultRootWindow(MainDisplay);

    int DefaultScreen = DefaultScreen(MainDisplay);
    GC Context = XDefaultGC(MainDisplay, DefaultScreen);

    int WindowX = 0;
    int WindowY = 0;
    int WindowWidth = 800;
    int WindowHeight = 600;
    int BorderWidth = 0;
    int WindowDepth = CopyFromParent;
    int WindowClass = CopyFromParent;
    Visual* WindowVisual = CopyFromParent;

    int AttributeValueMask = CWBackPixel | CWEventMask;
    XSetWindowAttributes WindowAttributes = {};
    WindowAttributes.background_pixel = 0xffffccaa;
    WindowAttributes.event_mask = StructureNotifyMask | KeyPressMask | KeyReleaseMask | ExposureMask;

    Window MainWindow = XCreateWindow(MainDisplay, RootWindow,
            WindowX, WindowY, WindowWidth, WindowHeight,
            BorderWidth, WindowDepth, WindowClass, WindowVisual,
            AttributeValueMask, &WindowAttributes);

    XMapWindow(MainDisplay, MainWindow);

    XStoreName(MainDisplay, MainWindow, "Moving rectangle. Use arrow keys to move.");

    Atom WM_DELETE_WINDOW = XInternAtom(MainDisplay, "WM_DELETE_WINDOW", False);
    if(!XSetWMProtocols(MainDisplay, MainWindow, &WM_DELETE_WINDOW, 1)) {
        printf("Couldn't register WM_DELETE_WINDOW property \n");
    }


    entity Box = {};
    Box.Width = 50;
    Box.Height = 80;
    Box.X = WindowWidth/2 - Box.Width/2;
    Box.Y = WindowHeight/2 - Box.Height/2;
    int StepSize = 5;

    int IsWindowOpen = 1;
    while(IsWindowOpen) {
        XEvent GeneralEvent = {};


        XNextEvent(MainDisplay, &GeneralEvent);

        switch(GeneralEvent.type) {
            case KeyPress:
            case KeyRelease:
            {
                XKeyPressedEvent *Event = (XKeyPressedEvent *)&GeneralEvent;
                if(Event->keycode == XKeysymToKeycode(MainDisplay, XK_Escape))
                {
                    IsWindowOpen = 0;
                }

                if(Event->keycode == XKeysymToKeycode(MainDisplay, XK_Down))
                {
                    Box.Y += StepSize;
                }
                else if(Event->keycode == XKeysymToKeycode(MainDisplay, XK_Up))
                {
                    Box.Y -= StepSize;
                }
                else if(Event->keycode == XKeysymToKeycode(MainDisplay, XK_Right))
                {
                    Box.X += StepSize;
                }
                else if(Event->keycode == XKeysymToKeycode(MainDisplay, XK_Left))
                {
                    Box.X -= StepSize;
                }
            } break;

            case ClientMessage:
            {
                XClientMessageEvent *Event = (XClientMessageEvent *) &GeneralEvent;
                if((Atom)Event->data.l[0] == WM_DELETE_WINDOW) {
                    XDestroyWindow(MainDisplay, MainWindow);
                    IsWindowOpen = 0;
                }
            } break;

        }

        XClearWindow(MainDisplay, MainWindow);
        XFillRectangle(MainDisplay, MainWindow, Context, Box.X, Box.Y, Box.Width, Box.Height);
    }
}
Compile it with: gcc 04_rectangles_and_action.c -o 04_rectangles_and_action -lX11
Here we just create a window a draw a rectangle around with arrow keys [up, down, left, right]. The only thing that we were required to add was to get a Screen and GC (Graphics Context). Screen is needed to get graphics context and graphic context is needed to do drawing some (bad) drawing on the default window. In this example we use XFillRectangle(…) to draw that rectangle. This GC stores information and about how graphics drawing commands should paint when different paint commands are used. In this example we just used a default one.
Apart from that in the this example we use ‘client messages’ in order to cleanly close window when pressin ‘x’ button on the window. Window manager is almost a regular client similar to our window and it does not close our window directly and rather send our window a special message. We first get an Atom (a special integer which identifies a string in the server) which is sent to used on window close from window manager. For this action this atom name is WM_DELETE_WINDOW. It is not required but remove that error message X connection to :0 broken (explicit kill or server shutdown). which we used to get in previous examples when closed window.
Video
Conclusion
Even though final version looks like a start of small game development you definetely should not make your games or apps like this. In the next post I will write about either software rendering or opengl (or both?) and show a little more appropriate approach to drawing stuff on the screen.
This post was not about teaching how to use Xlib for app development but rather show small steps in opening windows and with that build an intuition of how windows are opened in xlib.
I suggest reading more into parts that are not explaing and playing around with other function from the documentation. For example I would create a different GC with different colors, create cirles instead of rectangle and maybe draw some text. Either way I hope this post was helpful in building some intuition about basic Xlib.